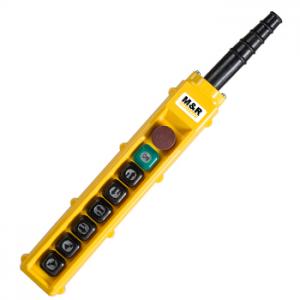
Double-speed button switch: The same button can be pressed twice, at a speed of 50%, and then at a speed of 50%. This means that the same button can be double-tapped, with two gears, used on a two-speed motor.
Double-speed button: The double-speed button is made according to the customer's electric
hoist's requirement. Before ordering the double-speed button, make sure that several groups of buttons are double-speed.
Model: COB-62HDT (6 holes)
Model: COB-63HDT (8 holes)
Model: COB-64HDT (10 holes)
Model: COB-65HDT (12 holes)
Model: COB-67HDT (16 holes)
Model: COB-68HDT (18 holes)
Features: Oil, dust and rain proof, excellent quality, belonging to high-grade button switch series products.
I. Scope of application
It is suitable for the circuit control system with AC 50Hz or 60Hz, voltage to 380V and DC working voltage to 220V. Applicable to open air, rain and snow, dust damage to the environment, such as cranes, electric
hoists and other equipment for remote control purposes. The product meets GB 14048.5 standard.
Type and Meaning
& ldquo; A” denotes with the main power switch, & ldquo; no letter & rdquo; denotes without the main power switch < br />.
& ldquo; B” means to bring up and stop the switch. & ldquo; K” means with start and stop switch < br />.
3. Normal working conditions and installation conditions
1. The ambient air temperature ranges from - 5 degrees to + 40 degrees, with an average of no more than + 35 degrees within 24 hours < br />.
2. Altitude: no more than 2000M < br />.
3. Atmospheric Conditions: When the highest temperature is + 40 degrees, the relative humidity of air does not exceed 50%. Higher relative humidity can be allowed at lower temperatures, for example, 90% at + 20 degrees. Special measures should be taken for occasional condensation due to temperature changes.
4. Pollution grade: grade 3 < br />.
5. Installation Category: Category II
6. No significant shaking, impact vibration and no rain or snow intrusion place < br />.
7. In the medium without explosion danger and without enough gas and dust to corrode metals and destroy insulation
4. Main parameters and technical performance
1. Characteristic
Contact resistance & nbsp; less than or equal to 50M < br />.
Mechanical life-nbsp; & nbsp; instantaneous type 1 million times, emergency stop self-locking button 50,000 times, other 25 times < br />.
Electrical life-nbsp; & nbsp; & nbsp; & nbsp; emergency stop self-locking button 50,000 times, other 500,000 times (1200 times/1200 hours, power factor cos = 0.4) < br />
Protection Isopole-nbsp; & nbsp; IP65
Contact capacity
Type of use - nbsp; rated working current of Ue (V) rated electrical appliances Le (A) < br />.
AC-15 sp; sp; spspspsp; spsp; spsp; &nnbsp; & nbsp; & nbsp; & nbsp; & nbsp; 2.5 < br />
220 4.5
DC-13 sp; sp; sp; spsp; &bsp; & nbsp; & nbsp; & nbsp; & nbsp; 0.3 < br />
110 0.6
5. Other
1. Structure and properties
COB series buttons adopt full plastic shell with beautiful appearance and reasonable structure. The product is equipped with rubber cable sheath and waterproof strip, which has good dust and rain proof performance < br />.
In addition to & ldquo; start & rdquo; & ldquo; stop & rdquo; button and circuit switch & ldquo; on & rdquo; & ldquo; self-locking button & rdquo; button, its button has automatic reset performance, and has positive and negative control mechanical interlocking mechanism, which not only simplifies the circuit, but also effectively protects the operation of circuit and equipment, in order to prevent circuit failure more reliably, button & ldquo; and & ldquo; Self-locking button & rdquo; button, can cut off the total power supply < br />.
Instructions for Use < br />
Remove the end cap, put in the sealing sheath, and fasten them to the end face of the button by screw < br />.
After removing the bottom cover and inserting all control wires into the sealing sheath, the buttons are tightened one by one on the terminals of the buttons according to the electrical schematic diagram < br />.
Check or test whether the wiring is correct. If everything is normal, tie the lead and fix it. Finally, reinstall the bottom cover.


